BaseCam SimpleBGC controller configuration guide
14.04.2014
Before you start to tune the controller read carefully the appropriate manual.
What P, I, D are
P — is a basic factor of stabilization, sets gain of the signal from the gyro in the feedback system.
D — is a stabilization factor of P. When value of D is not enough the system may go into a state of self-excitation.
I — is a gain factor of the absolute error of stabilization (the difference between the target and current angles) in the feedback system.
If you would like to figure out the algorithm of PID controller, read this article.
Configuration process of PID parameters is identical for all the firmware. Values of PID parameters for the firmware up to 2.3 version differ from values of PID parameters for the firmware from 2.4 and up. Also, values may differ between the 8-bit and 32-bit versions.
Before starting to configure P, I, D check mechanical and electrical parts of rigs.
- Make sure that there is no backlash in the rig and all nodes are firmly fixed, all screws are tightened.
- If construction of the rig is not stiff enough that it may cause complication of the rig configuration.
- Make sure that there is no friction in the bearings and no resistance to free rotation.
- The wires are flexible enough and do not prevent the free rotation of all axes.
- The camera is firmly fixed.
- The system is balanced in all axes.
- IMU orientation was configured right and all the necessary calibrations were done.
- Battery is charged above its average value.
- All electrical connections provide reliable contact.
Let’s start
1. Configure a value of Power when motor does not overheat (check this at least for 5 minutes) and gives sufficient torque to hold a camera. The lower is the value of Power, the better is the stabilization, but resistance to external influences is worse (such as bad balance, friction, air flows, etc.)
2. Set all values (P, I, D) for all the axes to 0.
3. Determine the direction of the rotation of all motors and the number of poles (if the number of poles is exactly known, it is better to set it manually).
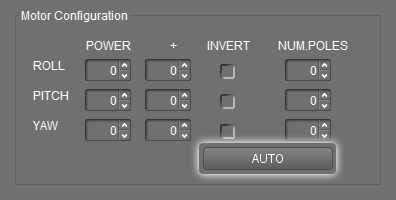
To do this, fix the rig on a stationary stand. Level the camera manually along the horizon (at this stage acceptable if the camera is not fixed perfectly straight). Press the button "Auto" (located near "Num.poles" in the section "Motor Configuration") and wait for the end of the operation.

Upon ending the checkboxes "invert" will be set where needed and automatically determined values will be set in the fields "Num.poles".
You can correct these values if they were automatically determined incorrectly. Number of poles equal to the number of motor magnets. Manufacturers can as well specify this in a model name. For example — 12N 14P means 14 poles.
After this you should not change the connection order of the motors connectors as this will reverse the direction of rotation.
Before configuring the values of PID parameters make sure to check:
- IMU is configured properly (read in the manual — "Configuring the IMU")
- Follow mode is switched off (is set to Disabled, "Estimate frame angles from motors" is off, Follow YAW is off). It is better to switch off RC control, too, by un-assigning axis from RC channel.
- "+" (additional power) is set to 0.
- PWM frequency is in necessary mode (if you need to change it in the future, you will need to reconfigure PID, so it’s better to set it before).
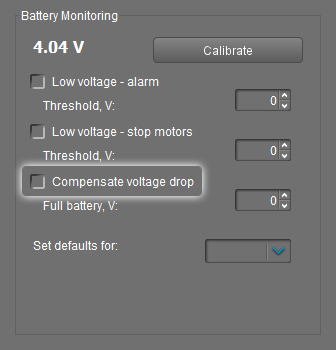
- If "Compensate voltage drop" is on (located in the "Service" tab, "Battery monitoring" group) or you plan to use this function in the future, set the voltage value appropriate to full charged battery.

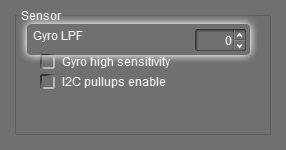
- Set "Gyro LPF" to zero on the "Advanced" tab.

It is better to configure each axis separately starting from PITCH
5. Set "I" to small value up to 0.05. Slowly increase gain factor "P". At occurrence of oscillations increase factor "D" (it is responsible for the damping of vibrations) in small increments until the oscillations have gone. Continue to increase P and D the same way. The purpose of this procedure to get maximum value of P when minimum value of D. Stop when increasing of D does not lead to stability, but on the contrary enhances the high-frequency vibration.
6. Repeat for ROLL. It may be that stabilization of ROLL causes instability of PITCH. In this case, you need to reduce P and D for PITCH. Mutual influence of axes appears stronger when the gimbal construction is less rigid.
7. Repeat the same for YAW.
8. Next configure the "I" parameter starting from PITCH. Increase it until oscillation begins, then reduce the value a little (can be reduced by 20% of the critical threshold).
9. Repeat for ROLL and YAW.
You configured PID for the horizontal position of the camera. If during the work the camera tilts up or down, the dynamics of the system may change, that can lead to instability for the settings obtained. In this case, you need to configure the rig using the worst position of the camera where oscillations are the strongest.
In the process of configuration you need to constantly check the tendency of the system to the self-excitation. If the system is on the edge of self-excitation then any external vibrations (vibrations of motors of the UAV, hits transmitted when walking, etc.) may cause short shakes (trembling the camera) which will be visible when shooting.
Stability of the system can be checked on the charts in the tab "Realtime Data".
Turn off all charts except GYRO and knock the camera in the direction of an axis you configuring. This knock will be seen on the graph as a fading waves. It is normal if the oscillation damps within 2-4 period and bad if it continues longer. It means that further adjustment of the rig is required: you need to reduce the gain factors (P, I) or increase the damping factor D.
Other settings affecting stabilization
GYRO high sensitivity. When switched on, the signal from gyro is pre-amplified twice. Using this option equal to the doubling the values of the factors P and D. It can be useful for heavy cameras.
Smoothing gyro (GYRO LPF). When the value differs from zero, data from gyro previously pass through a low pass filter. It can be useful for heavy cameras. It allows to increase the values of P and D when there are external vibrations (for example, from motors of multicopter).
